by Mark Murray
Mark Murray is Director of Technical Services and Systems Integration at Arlington ISD in Texas.

While photographers prefer to work with natural light as often as possible, sometimes adding some light to a scene is necessary. Before using a flash there are several important things to remember.
- A flash must synchronize with the camera’s shutter. This means that the shutter must be fully open when the flash goes off. Too fast of a shutter speed means that only part of the photo will be correctly exposed. Today’s electronic cameras will often recognize when a flash is being used and will prevent too fast a shutter speed from being selected.
- Since the shutter speed only needs to sync with the flash, exposure is controlled primarily by the aperture or f-stop. If the flash has a built-in meter or communicates with the meter in the camera, a photographer can set the f-stop on the flash, and the flash will adjust the amount of light required to match that
f-stop. - Because the light from a flash must travel from the flash to the subject, bounce off the subject and then come back to the camera for the exposure, the total distance can have a dramatic impact on the correct exposure. Depending on the power of the flash and how reflective the subject is, the flash might only be useful within 10-15 feet.
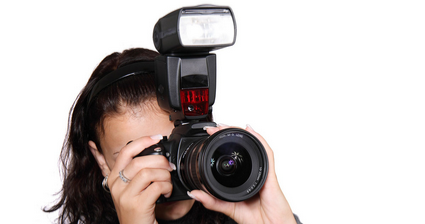
One of the least effective flashes to use is the one built into a camera. Besides creating a very harsh, unflattering light, it also tends to produce red-eye in people. A journalism program should have an external flash high on their list of equipment needs to help avoid these issues.
By controlling the light from an external flash, a photographer can add light to the scene and still make it appear to be natural light. One way to do this is to diffuse the light by placing a semi-translucent material over the head of the flash.
Many flashes come with a plastic hood to place on the front of the flash. Portrait photographers often use umbrellas or soft boxes to soften the light. The farther away the diffusion material is from the flash head, the softer the light will be.
Another common method for adjusting the light is to bounce the light off a surface before it reaches the subject. This not only will diffuse the light but also allows the photographer to change the direction of the light. Instead of light coming from the direction of the camera, it can strike the subject from overhead or from the side.
Bouncing a flash requires some careful thought. The flash should be aimed at a point halfway between the flash and the subject.
The distance the light is traveling can mean the loss of one to two f-stops of light by the time it gets back to the camera. Pay close attention to the color of the surface off which the light reflects. It can actually change the color of the light on the subject.
Also, a flash can be used to add light to a scene when the subject is in shadows or has a bright background. In this situation, the flash acts as a fill or secondary light source. The primary exposure is based on the brighter area behind the subject. Use this technique to prevent a silhouette.
Ultimately, a photographer should strive to be in control of the light, especially when that light is being added to the scene by the photographer. Owning and understanding how to use an external flash will help the photographer create more professional images.